My Work
|
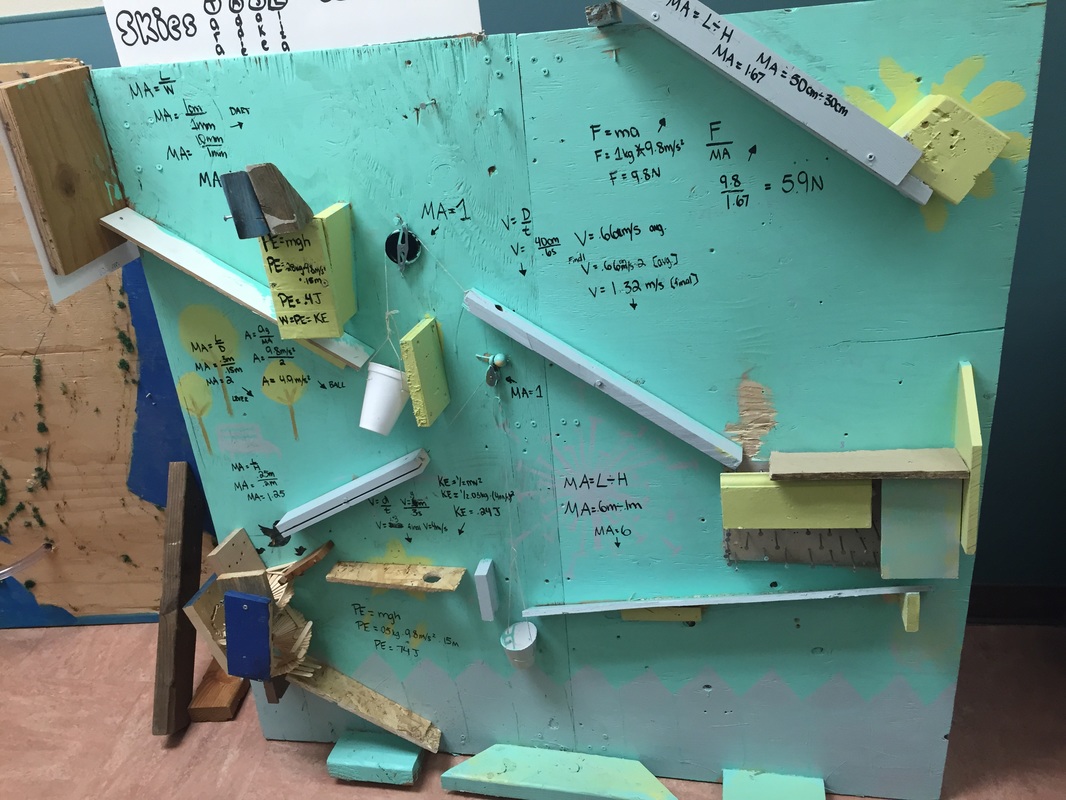
The purpose of the Rube Goldberg project was to achieve a simple action by using several complex steps. In this project we used pulleys, levers, inclined planes, screws, and wedges.
Step 1: weight slides and pulls trigger (of nerf gun that is not shown in picture) Step 2: Nerf gun fires tack dart (wedge) and pops balloon Step 3: ball from balloon drops into cup which activates pulley Step 4: pulley pulls lever which angles the ball to fall Step 5: ball goes through pegboard Step 6: ball rolls down inclined plane into cup Step 7: cup activates pulley and tilts lever Step 8: ball rolls into screw Step 9: ball rolls down inclined plane and hits weight Step 10: weight falls, releasing trap door Step 11: mentos falls from trap door into coke creating chemical reaction |
Mechanical Advantage: (input distance / output distance), we used mechanical advantage to find how much easier a simple machine made something, like our pulley, which made pulling up the lever easier with a MA of 1
Work: (force x distance) work is used a lot to find how much an object pushes on another, like the ball pushing the weight Potential and Kinetic energy:. (PE = mgh; KE = mv^2 / 2) potential and kinetic energy are supposed to be equal, but since we don’t live in a perfect world, they are not. We used this a lot so we could find the energy of objects before they fall and then be able to find out the friction that is exerted on that object |


Below is the video of our Rube Goldberg in action. You can refer back to the steps listed above to follow the energy transfers and understand what movements I am talking about.
|
Conclusion:
During this project I learned a lot. Before we even started the project, Mr. Williams taught us a ton about formulas and how to use them, along with critical thinking to make decisions and how to use dangerous tools. I, personally, got very good at power sawing, after being afraid of it at first. It was really fun to brainstorm and watch our ideas slowly turn into a machine that efficiently did the task we programmed it for; dropping a mentos into a diet coke. We first wanted it to take a polaroid picture, but found that had too many problems like the cost of film, and figuring out a way to push the button that was in an odd place. After we worked out our steps and finished our schematic we were off to build our masterpiece. My favorite part of our process was painting it. Jake wasn't there the day we painted and gave me no specific color scheme, so we painted a beautiful board with trees, a park bench, birds, a dandelion, a sun, a starfish, and to tie it all together- a picket fence. After all the fun of adding color to our machine, we had to work out the physics behind it. We calculated mechanical advantage, kinetic and potential energy, speed, force, and time. We could finally understand why everything did what it did and how. During the process of running all the steps of the machine, we had many mishaps. One that occurred frequently was the balloon popping. Trying to pop the balloon only during a run was hard. There were sharp things all around the classroom, people (including us) who wanted to play with it, and the balloon itself which would sometimes deflate or appear with holes. Through all the challenges and fun moments, we made it through and finished it with a good understanding and presentation of how everything worked. I hope this project was an impressive one to others because I sure thought that my group and I did a great job. |
Construction Record:
8/31: original sketch and planning 9/1: sketch completion & materials 9/3: full scale schematic 9/8: built 4x4 board 9/10: step 1 complete 9/11: step 2 & 3 complete 9/15: pulley setup #1 9/16: first lever 9/18: pegboard 9/22: inclined planes & tweaking 9/23: pulley & lever #2 setup 9/25: screw & final step 9/28: test runs & tweaking 9/29: test runs & presentation 9/30: presentation & video 9/31: presentation day |
